Apple Tree Grafting - A Guide
Posted: Wed Jan 12, 2011 2:43 pm
Here's a piece I produced recently to learn how and why to graft. This piece follows the 'cleft graft' which is fairly easy to master and yields good results. Have a nose, Cheers!
In October 2009 I was offered the opportunity to visit Belgium as host partners to the European Conservation Action Network on an active working holiday specialising in orchards, their produce and management. The excursion enabled a wide range of individuals to come together and participate in a variety of cultural activities and life-long skills development.
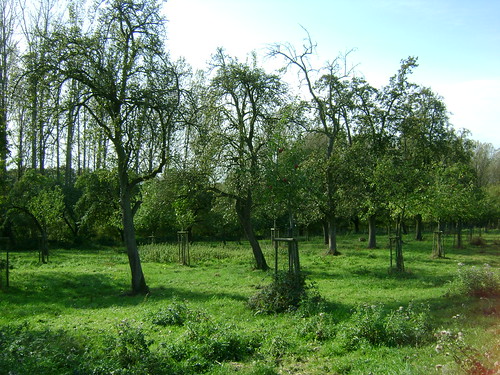
The Limburg region of Belgium holds many commercial orchards and is an excellent resource in understanding the management techniques required in maintaining and managing fruit orchards to provide revenue for the local economy. Some techniques are sympathetic (as in restoration of older orchards) some more intensive, spraying regimes and other restrictions. Apple production in this region can be seen as intensive, almost a mono-culture but experiencing it first hand has been essential in creating an understanding and comparison between traditional orchards found here in the UK and those hundred hectare orchards in Belgium.
It was extremely valuable to understand the restraints on apple production in Belgium and also very surprising to learn that produce from apples taken for granted in the UK is mainly unheard of in Belgium – in particular cider! It may take a few more years of gentle persuasion to develop the palette of a Belgian to the delights of our cultural drink.
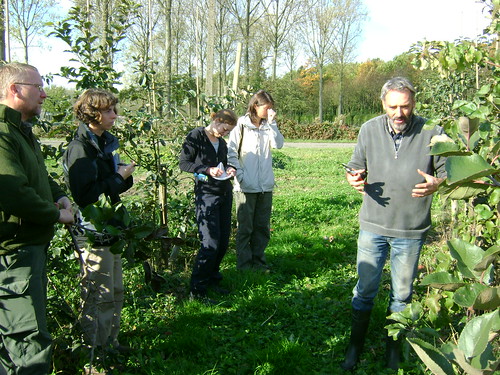
During the trip we developed a working relationship with the host partners and as such acquired numerous new skills such as pruning techniques, grafting, apple production and selling, products – including delicious syrups. Although the trip was primarily apple-based there were further opportunities in developing our grasp of the Belgian language, sampling a wide range of interesting products, including famous Belgium beers and visiting cultural delights such as museums, cultural centres and towns.
In particular I found the technique of grafting particularly enjoyable and a useful method of ensuring the continuation of traditional orchards in the UK. The techniques used can be applied when attempting to restore and manage traditional orchards ensuring rare apple varieties are not lost and a healthy nursery stock can be maintained.
The Art of Grafting
What is Grafting?
Grafting is a technique which enables two (or more) plants to become joined in order to produce a variety of desired results. Almost all apple trees do not produce a plant that is ‘true’ to the parent tree, planting a Cox variety pip could produce a sapling but it will not be a Cox apple tree. Many pips when successfully propagated will form large sized trees, often a crab variety and many bitter in taste.
By taking a cutting from a viable tree and bonding it to a suitable rootstock we can control not only the size, vigour and habit of the tree but more importantly the variety. So, a Cox apple cutting grafted to a rootstock can produce Cox apples.
The top section of the plant is known as the ‘scion’, this is the cultivar or variety which an individual wishes to influence by changing growth habits and size to achieve a desired result.
The scion is joined to a suitable rootstock which controls particular factors and is typically from a similar genus (or family) of plant species; however other closely related species have been known to become grafted successfully.
By cutting the scion to form a graft the cambium layer of the plant is revealed. This layer found in all ‘woody’ plants is a layer of cells which are formed in a band just below the surface of the bark. The purpose of this living tissue layer is to transport minerals and water up and down the plant.
The cambium layer is also responsible for forming tissue growth and in particular callusing where cuts and joins are made. In order to perform a successful graft the cambium layer of each section of the rootstock and scion are aligned and sealed together to ensure the direct flow of nutrients.
Most common forms of grafting are applied to trees and shrubs with the technique utilised to produce results on fruit trees, in particular varieties of apple. An increase in the production of fruit trees and size of trees can be controlled through this method but other results from grafting can be obtained, such as:
• Create plant forms – a suitable horticultural technique which can aid in developing new shapes within plant forms – this is best witnessed in weeping forms which are grafted onto standard rootstocks, for example a weeping dogwood (Cornus florida, L. var. pedula) can be grafted to a standard flowering dogwood rootstock resulting in a tree which provides the ‘weeping’ effect but is controlled in height by the graft, typically at around 3 feet onto the rootstock.
• Growth habits – by selecting certain rootstocks a grafted plant can be controlled by a more vigorous rootstock which in turn allows greater height, yield, and resistance to particular diseases which the original plant may succumb to without the new root system. Grafting is also suitable for trees which would otherwise be vulnerable to insect damage or effects of drought, this is particular useful in large scale commercial fruit orchards.
• Cultivars – it is possible to ensure that favourable cultivars (of fruit in particular) continue to produce crops when grafted onto viable rootstocks. In orchards this technique ensures that older varieties are not lost and are succeeded by new plantings of grafted stock. It is also possible to graft many different varieties onto one tree resulting in a differing forms, blossom colour, leaf style and ultimately varying fruits. This is also known as ‘Top Working’. In some cases where cross pollination can not be achieved between separate trees it is possible to graft a male scion onto a female plant enabling the tree to ‘self pollinate’.
.
Preparing to Graft - Apples
Tools required
For greater results the following items will ensure better a better graft, however a sharp knife is the most important part of any grafting kit:
• One-sided Rose knife or similar sharp pen knife
• Cleaving tool
• Pruning scissors
• Sealing wax or similar compound
• Grafting tape (or plastic wrapping – shrink wrap, raffia, masking tape)
Scion
• The scion is taken from the previous seasons’ growth, whilst dormant ideally in late autumn or early winter. This cutting is typically one years’ growth and ranges from 6 to 10 inches in length, about the width of a pencil. In most cases the scion is taken at this particular length and will be trimmed to a suitable length depending on the required grafting technique.
• The scions should be tied, labelled with the variety and stored in a cool, moist place – suitable wrapped in plastic or moss so they do not dry out. Other mediums considered adequate for storage include peat, sawdust and even moist cotton.
Harvesting suitable scions
Rootstock
Apple trees have been manipulated over many centuries to provide optimum yields and fruit varieties through controlling the rootstock they are grafted onto. The original rootstocks were collected in the 1900s throughout Europe and have been improved upon to alter vigour, disease resistance and habit. In total there are 20 rootstocks utilised for this purpose and as such have been named in accordance to their intentional result.
Every rootstock is preceded by the letter ‘M’, ‘MM’, ‘EMLA’ followed by a number. These letters apply to the research stations in which the rootstock was cultivated or improved upon (other letters apply to those stocks from outside the UK).
Common rootstocks (UK):
M27 – Very small tree, little requirement for pruning, 5 foot height. Small yield
M9 – Dwarfing rootstock, fruits when young, hardy, tolerant of wet but vulnerable to drought, 9 foot height.
M26 – Utilised in orchards, fruits early, hardy, dislikes wet/clay soils, 8 – 10 foot height
MM106 – Solid roots good anchorage, fruits early, long fruiting season, good substitute for M26 in wet/clay soils, vigorous, 9 – 11 foot height
M7 – Very hardy, prefers deeper soils, tolerates wet, fruits later (5th year) abundant crop, 9 – 11 foot height
M111 – Large tree, semi dwarfing habit, 10 – 12 foot height
M2 – Fairly vigorous, similar to M111, 10 – 12 foot height
M25 – Full size, large tree, very vigorous, wide branch spread, 12 – 15 foot height
Most common rootstocks are found in sizes M27, M9, M26 and MM106 – typically as garden trees often grown in pots or as espaliers of suitably fanned forms.
The optimum time to graft is in late winter to early spring, prior to initial bud burst and best achieved when both the rootstock and scion are dormant. It is noted that frosts in later spring can damage initial budding leaves so grafting is dependant on good conditions or the ability to protect grafted stocks from harsh conditions is required. Regional variations in climate would need to be observed.
On large scale commercial fruit farms the grafting technique is performed in situ with suitable scions taken from storage and grafted onto rootstocks arranged in rows in the field (field-grown stock). Nurseries (providing a wide range of deciduous trees) adopt this more practical technique.
Graft techniques:
There are a wide range of grafting techniques utilised to provide varying results. The most common of which are:
Whip Graft – small branches of approximately ½ inch in diameter and similar size rootstocks are used. This technique uses a one-sided diagonal cut on each part at opposite sides to combine together.
Side Graft – suitable for branches approximately ¼ to ¾ inch in diameter and can be used to restrict growth in larger branches.
Cleft Graft
The easiest and most common method of grafting is known as cleft grafting. This follows the same grafting technique which allows the joining of the desired cultivar apple (scion) to a suitable rootstock controlling the eventual size of the complete tree (in addition to other factors highlighted in the introduction). The name ‘cleft’ is attributed to the style in which the two sections are joined. This technique is sometimes used on the trunk of a small tree where a number of scions can be inserted in one cleft.
In this article we will focus on using scion and rootstock of smaller sizes, also known as understock – this technique combines trees of a younger age. The scion is taken as described before and can be trimmed to size depending on the size of the rootstock.
Technique
The object of creating a cleft graft is to cut the scion so that it forms a ‘V’ wedge exposing the cambium layers either side. The rootstock is cut and levelled revealing a flat surface also exposing the cambium layers, though as a ringed pattern. These two parts can be joined and sealed forming a tight bond between the layers ensuring the flow of nutrients can pass between the grafts. A step by step guide explores this technique in more detail below:
Step by step
Rootstock:
• The rootstock should be approximately 1 to 4 inches in diameter and can be larger than the scion. The rootstock should be prepared so that it is cleanly cut perpendicular to the intended scion graft, flat across the top. If there is danger of strong winds the rootstock cut can be angled (45 degrees) at the direction of the wind to prevent breakages at the graft union.
• Using a sharp knife as a wedge cut a slit down the centre of the stock, about 1 - 2 inches in length. By levering the knife prise the slit open to form a v-shaped cleft wedge exposing the cambium layer below. Alternatively a special clefting tool could be used for this purpose.
Scion:
• To create a good graft, first select a scion from the stock with 3 to 5 good buds.
• You can trim the top of the scion to the desired length depending on the form of the final tree, for example – leaving 4 or 5 buds will result in a ‘full standard’ tree or alternatively leaving 2 or 3 buds will result in a half size tree (trunk length).
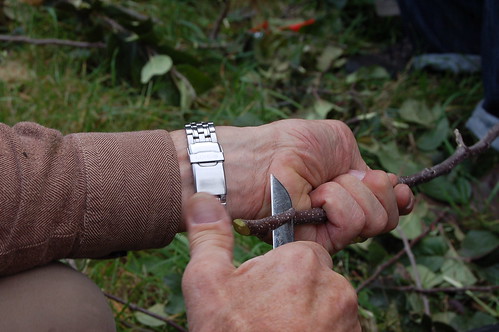
Tapering the cuts on the scion
• The object of the cleft graft is to create a v-shaped scion which can be wedged into the cleft of the rootstock. To do this, take the scion in one hand tilting the lowest bud towards the body.
• Using the knife draw the blade from the opposite side of the bud towards the body, so that a tapered diagonal cut is formed.
• Rotate the scion and repeat the process just below the bud so this also results in a tapered cut. You are aiming for a wedge approximately 1 inch in length.
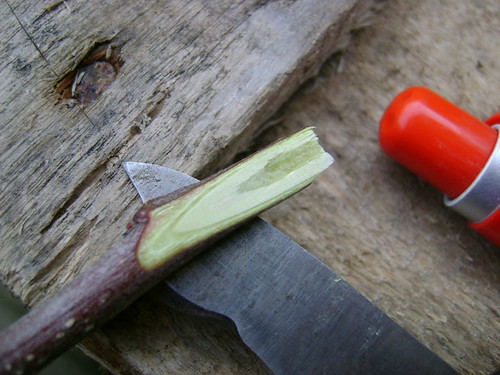
The cambial layer revealed as a thin ribbon
between the bark and central pith of the scion.
• The result should be a v-shaped wedge, one side slightly wider than the other. The art in this technique is to make the cut in one smooth slide. The cambium layer should be easy to see exposed on the surface of the wedge. It is possible to cut across the end of the wedge to form a straight edge if the taper does not end evenly.
Combining (also known as the ‘Union’):
• Prise apart the cleft on the rootstock using a suitable tool to expose the cambium layer below.
• Insert the scion so that the wide edge is facing outwards. Ensure the cambial layers are touching tightly and there are no gaps (it may be necessary to trim the scion in order to fit better). The cleft in the rootstock should keep the scion firmly in place. It is common practice to insert two scions into the rootstock (of a larger size) which helps to seal the wedge more and also doubles the chance of a graft being successful.
• To keep the two parts secured together use grafting tape to tightly wrap around the joined section and tie off.
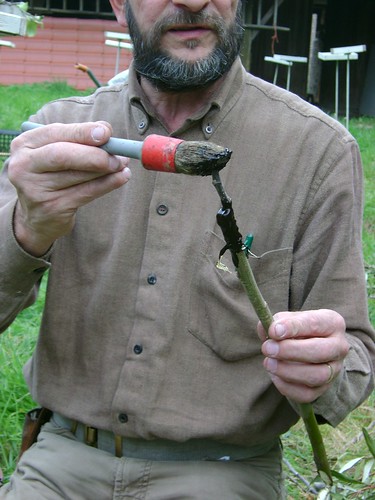
• Seal any exposed cut areas with grafting wax or alternative sealant to repel water and retain moisture.
• Trim the top of the scion to the desired length, noting the number of buds required to form the size of the standard. Aim to cut the top of the scion just above a bud – this will be the ‘leading’ bud after dormancy. Seal the top of the scion with wax to prevent water ingress, stopping the rising of sap and halting growth from this point. The aim is to encourage the side buds to grow.
Aftercare:
• The grafted stock will require storage until the planting season ensuring the roots are kept moist or planted out into a nursery bed or suitable pots. The waiting process can begin and if successful the first signs of bud burst should show in early spring.
• Protect from frosts, wind and pests, including birds. Any shoots growing from below the graft from the rootstock can be left to grow in the first season but should be trimmed back after one year in winter.
Sources and further reading:
http://www.extension.umm.edu/distributi ... 0532c.html
The Grafters Handbook, R.J Gardener. ISBN: 0571 11393 1
Eucan, Belgium – Grafting Techniques – practical session, October 2009
Grafting, Charlie Delius and Partick Keegan
Fruit, Harry Baker, RHS. ISBN: 0 85533 705 2
Photographs – various sources and individuals attending Eucan, October 2009.
In October 2009 I was offered the opportunity to visit Belgium as host partners to the European Conservation Action Network on an active working holiday specialising in orchards, their produce and management. The excursion enabled a wide range of individuals to come together and participate in a variety of cultural activities and life-long skills development.
The Limburg region of Belgium holds many commercial orchards and is an excellent resource in understanding the management techniques required in maintaining and managing fruit orchards to provide revenue for the local economy. Some techniques are sympathetic (as in restoration of older orchards) some more intensive, spraying regimes and other restrictions. Apple production in this region can be seen as intensive, almost a mono-culture but experiencing it first hand has been essential in creating an understanding and comparison between traditional orchards found here in the UK and those hundred hectare orchards in Belgium.
It was extremely valuable to understand the restraints on apple production in Belgium and also very surprising to learn that produce from apples taken for granted in the UK is mainly unheard of in Belgium – in particular cider! It may take a few more years of gentle persuasion to develop the palette of a Belgian to the delights of our cultural drink.
During the trip we developed a working relationship with the host partners and as such acquired numerous new skills such as pruning techniques, grafting, apple production and selling, products – including delicious syrups. Although the trip was primarily apple-based there were further opportunities in developing our grasp of the Belgian language, sampling a wide range of interesting products, including famous Belgium beers and visiting cultural delights such as museums, cultural centres and towns.
In particular I found the technique of grafting particularly enjoyable and a useful method of ensuring the continuation of traditional orchards in the UK. The techniques used can be applied when attempting to restore and manage traditional orchards ensuring rare apple varieties are not lost and a healthy nursery stock can be maintained.
The Art of Grafting
What is Grafting?
Grafting is a technique which enables two (or more) plants to become joined in order to produce a variety of desired results. Almost all apple trees do not produce a plant that is ‘true’ to the parent tree, planting a Cox variety pip could produce a sapling but it will not be a Cox apple tree. Many pips when successfully propagated will form large sized trees, often a crab variety and many bitter in taste.
By taking a cutting from a viable tree and bonding it to a suitable rootstock we can control not only the size, vigour and habit of the tree but more importantly the variety. So, a Cox apple cutting grafted to a rootstock can produce Cox apples.
The top section of the plant is known as the ‘scion’, this is the cultivar or variety which an individual wishes to influence by changing growth habits and size to achieve a desired result.
The scion is joined to a suitable rootstock which controls particular factors and is typically from a similar genus (or family) of plant species; however other closely related species have been known to become grafted successfully.
By cutting the scion to form a graft the cambium layer of the plant is revealed. This layer found in all ‘woody’ plants is a layer of cells which are formed in a band just below the surface of the bark. The purpose of this living tissue layer is to transport minerals and water up and down the plant.
The cambium layer is also responsible for forming tissue growth and in particular callusing where cuts and joins are made. In order to perform a successful graft the cambium layer of each section of the rootstock and scion are aligned and sealed together to ensure the direct flow of nutrients.
Most common forms of grafting are applied to trees and shrubs with the technique utilised to produce results on fruit trees, in particular varieties of apple. An increase in the production of fruit trees and size of trees can be controlled through this method but other results from grafting can be obtained, such as:
• Create plant forms – a suitable horticultural technique which can aid in developing new shapes within plant forms – this is best witnessed in weeping forms which are grafted onto standard rootstocks, for example a weeping dogwood (Cornus florida, L. var. pedula) can be grafted to a standard flowering dogwood rootstock resulting in a tree which provides the ‘weeping’ effect but is controlled in height by the graft, typically at around 3 feet onto the rootstock.
• Growth habits – by selecting certain rootstocks a grafted plant can be controlled by a more vigorous rootstock which in turn allows greater height, yield, and resistance to particular diseases which the original plant may succumb to without the new root system. Grafting is also suitable for trees which would otherwise be vulnerable to insect damage or effects of drought, this is particular useful in large scale commercial fruit orchards.
• Cultivars – it is possible to ensure that favourable cultivars (of fruit in particular) continue to produce crops when grafted onto viable rootstocks. In orchards this technique ensures that older varieties are not lost and are succeeded by new plantings of grafted stock. It is also possible to graft many different varieties onto one tree resulting in a differing forms, blossom colour, leaf style and ultimately varying fruits. This is also known as ‘Top Working’. In some cases where cross pollination can not be achieved between separate trees it is possible to graft a male scion onto a female plant enabling the tree to ‘self pollinate’.
.
Preparing to Graft - Apples
Tools required
For greater results the following items will ensure better a better graft, however a sharp knife is the most important part of any grafting kit:
• One-sided Rose knife or similar sharp pen knife
• Cleaving tool
• Pruning scissors
• Sealing wax or similar compound
• Grafting tape (or plastic wrapping – shrink wrap, raffia, masking tape)
Scion
• The scion is taken from the previous seasons’ growth, whilst dormant ideally in late autumn or early winter. This cutting is typically one years’ growth and ranges from 6 to 10 inches in length, about the width of a pencil. In most cases the scion is taken at this particular length and will be trimmed to a suitable length depending on the required grafting technique.
• The scions should be tied, labelled with the variety and stored in a cool, moist place – suitable wrapped in plastic or moss so they do not dry out. Other mediums considered adequate for storage include peat, sawdust and even moist cotton.
Harvesting suitable scions
Rootstock
Apple trees have been manipulated over many centuries to provide optimum yields and fruit varieties through controlling the rootstock they are grafted onto. The original rootstocks were collected in the 1900s throughout Europe and have been improved upon to alter vigour, disease resistance and habit. In total there are 20 rootstocks utilised for this purpose and as such have been named in accordance to their intentional result.
Every rootstock is preceded by the letter ‘M’, ‘MM’, ‘EMLA’ followed by a number. These letters apply to the research stations in which the rootstock was cultivated or improved upon (other letters apply to those stocks from outside the UK).
Common rootstocks (UK):
M27 – Very small tree, little requirement for pruning, 5 foot height. Small yield
M9 – Dwarfing rootstock, fruits when young, hardy, tolerant of wet but vulnerable to drought, 9 foot height.
M26 – Utilised in orchards, fruits early, hardy, dislikes wet/clay soils, 8 – 10 foot height
MM106 – Solid roots good anchorage, fruits early, long fruiting season, good substitute for M26 in wet/clay soils, vigorous, 9 – 11 foot height
M7 – Very hardy, prefers deeper soils, tolerates wet, fruits later (5th year) abundant crop, 9 – 11 foot height
M111 – Large tree, semi dwarfing habit, 10 – 12 foot height
M2 – Fairly vigorous, similar to M111, 10 – 12 foot height
M25 – Full size, large tree, very vigorous, wide branch spread, 12 – 15 foot height
Most common rootstocks are found in sizes M27, M9, M26 and MM106 – typically as garden trees often grown in pots or as espaliers of suitably fanned forms.
The optimum time to graft is in late winter to early spring, prior to initial bud burst and best achieved when both the rootstock and scion are dormant. It is noted that frosts in later spring can damage initial budding leaves so grafting is dependant on good conditions or the ability to protect grafted stocks from harsh conditions is required. Regional variations in climate would need to be observed.
On large scale commercial fruit farms the grafting technique is performed in situ with suitable scions taken from storage and grafted onto rootstocks arranged in rows in the field (field-grown stock). Nurseries (providing a wide range of deciduous trees) adopt this more practical technique.
Graft techniques:
There are a wide range of grafting techniques utilised to provide varying results. The most common of which are:
Whip Graft – small branches of approximately ½ inch in diameter and similar size rootstocks are used. This technique uses a one-sided diagonal cut on each part at opposite sides to combine together.
Side Graft – suitable for branches approximately ¼ to ¾ inch in diameter and can be used to restrict growth in larger branches.
Cleft Graft
The easiest and most common method of grafting is known as cleft grafting. This follows the same grafting technique which allows the joining of the desired cultivar apple (scion) to a suitable rootstock controlling the eventual size of the complete tree (in addition to other factors highlighted in the introduction). The name ‘cleft’ is attributed to the style in which the two sections are joined. This technique is sometimes used on the trunk of a small tree where a number of scions can be inserted in one cleft.
In this article we will focus on using scion and rootstock of smaller sizes, also known as understock – this technique combines trees of a younger age. The scion is taken as described before and can be trimmed to size depending on the size of the rootstock.
Technique
The object of creating a cleft graft is to cut the scion so that it forms a ‘V’ wedge exposing the cambium layers either side. The rootstock is cut and levelled revealing a flat surface also exposing the cambium layers, though as a ringed pattern. These two parts can be joined and sealed forming a tight bond between the layers ensuring the flow of nutrients can pass between the grafts. A step by step guide explores this technique in more detail below:
Step by step
Rootstock:
• The rootstock should be approximately 1 to 4 inches in diameter and can be larger than the scion. The rootstock should be prepared so that it is cleanly cut perpendicular to the intended scion graft, flat across the top. If there is danger of strong winds the rootstock cut can be angled (45 degrees) at the direction of the wind to prevent breakages at the graft union.
• Using a sharp knife as a wedge cut a slit down the centre of the stock, about 1 - 2 inches in length. By levering the knife prise the slit open to form a v-shaped cleft wedge exposing the cambium layer below. Alternatively a special clefting tool could be used for this purpose.
Scion:
• To create a good graft, first select a scion from the stock with 3 to 5 good buds.
• You can trim the top of the scion to the desired length depending on the form of the final tree, for example – leaving 4 or 5 buds will result in a ‘full standard’ tree or alternatively leaving 2 or 3 buds will result in a half size tree (trunk length).
Tapering the cuts on the scion
• The object of the cleft graft is to create a v-shaped scion which can be wedged into the cleft of the rootstock. To do this, take the scion in one hand tilting the lowest bud towards the body.
• Using the knife draw the blade from the opposite side of the bud towards the body, so that a tapered diagonal cut is formed.
• Rotate the scion and repeat the process just below the bud so this also results in a tapered cut. You are aiming for a wedge approximately 1 inch in length.
The cambial layer revealed as a thin ribbon
between the bark and central pith of the scion.
• The result should be a v-shaped wedge, one side slightly wider than the other. The art in this technique is to make the cut in one smooth slide. The cambium layer should be easy to see exposed on the surface of the wedge. It is possible to cut across the end of the wedge to form a straight edge if the taper does not end evenly.
Combining (also known as the ‘Union’):
• Prise apart the cleft on the rootstock using a suitable tool to expose the cambium layer below.
• Insert the scion so that the wide edge is facing outwards. Ensure the cambial layers are touching tightly and there are no gaps (it may be necessary to trim the scion in order to fit better). The cleft in the rootstock should keep the scion firmly in place. It is common practice to insert two scions into the rootstock (of a larger size) which helps to seal the wedge more and also doubles the chance of a graft being successful.
• To keep the two parts secured together use grafting tape to tightly wrap around the joined section and tie off.
• Seal any exposed cut areas with grafting wax or alternative sealant to repel water and retain moisture.
• Trim the top of the scion to the desired length, noting the number of buds required to form the size of the standard. Aim to cut the top of the scion just above a bud – this will be the ‘leading’ bud after dormancy. Seal the top of the scion with wax to prevent water ingress, stopping the rising of sap and halting growth from this point. The aim is to encourage the side buds to grow.
Aftercare:
• The grafted stock will require storage until the planting season ensuring the roots are kept moist or planted out into a nursery bed or suitable pots. The waiting process can begin and if successful the first signs of bud burst should show in early spring.
• Protect from frosts, wind and pests, including birds. Any shoots growing from below the graft from the rootstock can be left to grow in the first season but should be trimmed back after one year in winter.
Sources and further reading:
http://www.extension.umm.edu/distributi ... 0532c.html
The Grafters Handbook, R.J Gardener. ISBN: 0571 11393 1
Eucan, Belgium – Grafting Techniques – practical session, October 2009
Grafting, Charlie Delius and Partick Keegan
Fruit, Harry Baker, RHS. ISBN: 0 85533 705 2
Photographs – various sources and individuals attending Eucan, October 2009.